Have you heard of Taggies? I saw one for my first time at a shower last weekend. They are so cute. And practical!
And expensive...

regular price $24.95 (Gasp!)
Wade loves to put everything in his mouth. But he especially likes ribbons, strings and high chair straps. As soon as I saw it I thought to myself 'Self, you can make that!'. A stroll through the fabric section of Wal-mart reminded me that after I purchased the fleece fabric and ribbon I would definitely spend more than even the super clearance Taggy I saw online for $9. Bummer.
This morning as I lay on the floor playing with Wade he grabbed for the string on my hoodie. Immediately it went in his mouth. I thought to myself 'Self, if you were to make a Taggy, you would have to consider putting such a string on it.' I started thinking of the other things I would have to put on it. Ribbons, of course; a piece of strappy stuff like his high chair straps; maybe some buttons on a string...wait a second, I have all those things!!! The fabric, what could I use for the fabric? I took my hoodie off (so Wade could continue chewing on the string) and headed to his closet. And there I came upon it. The stack of extra baby blankets. If you're a new mom, you know you have at least 3 in your closet. What? You say, you were saving those to regift? Do the person a favor...use it to make her a Taggy (and of course one for yourself). Join me on my Taggy making adventure...
Note: I am NOT a seamstress. And you don't have to be one either. If you've ever made a pillow, no, if you've ever held a pillow, you can do this. It's basically the same, except you gotta add the taggies.
Step 1
1. Locate and dust off your sewing machine. If you don't have one, you can do this by hand...just find some needle and thread.
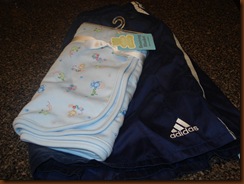
2. Decide on your fabric. I'm using a medium weight blanket for one side. I wanted the other side to be silky so I'm using an old pair of athletic shorts (they originally belonged to Andrew-I wore them and got paint on them (oops!) so they became mine, then I wore them through pregnancy...remember I gained 60lbs. so you can imagine that they're a little stretched out now!). Other items I considered were: fleece blanket, t-shirt and dri-fit shirt, towel. Be creative.
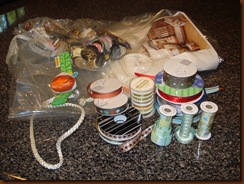
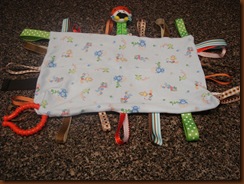
3. Gather your tags. I had a lot of ribbon from scrapbooking so that was an easy start. I found a piece of string like the one from my hoodie. Mom helped me decide against the buttons-too risky if he could pull them off. I cut a piece of strap off of a hiking pack that my brother made useless by cutting off the waistband but I love it to much to part with it. I also had a few of those rattles that velcro to a baby's wrist or ankle-Wade never liked it being velcroed on. Again, be creative. Even if you're not crafty, I guarantee you can find items around your house. Or beg, borrow or steal some from friends.
4. Cut your fabrics to size. Actually, cut the fabric to about 1-2in. bigger than you want the finished product to be. My finished product is going to be approximately 9 x 9in. But make yours whatever size you want.
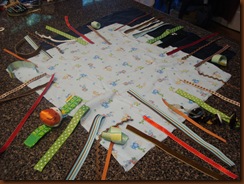
5. Cut your tags to size. You want them varying sizes. Now, they are going to be looped so you actually want to cut them twice as long as you want them. Then leave about 1/2 in. extra.
6. Lay them all out. I have 8 tags per side.
***Pause: I did all of the above and then blogged about it. This is what happened next.
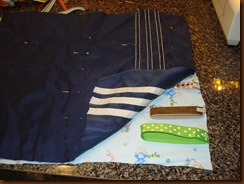
7. Lay your material down right sides facing each other. Pin the fabrics together in the middle. Pin (or use sewing tape) your tags to the edges facing inward like so...
8. Carefully sew around the edges of your fabric but leave a 2-3in. gap to turn it right side out. Use a straight stitch, thread color doesn't matter (read: use whatever is already on your bobbin).
***There is a far easier way to do this. Of course I didn't realize it until I was done. It would require a little extra stitching but would be worth it to me as I am not that great at keeping everything aligned as I guide it through my machine. Easier way...
- Go back to step #7. Do NOT lay both pieces of material down- just one, face up. Continue on with the directions, taping/pinning the tags on. Then sew around the edges. You are just sewing on the tags. Then you would lay down the other piece of fabric, face down (like above). Then stitch that fabric onto the tagged fabric leaving a 2-3in. gap to turn right side out. You'll want to stitch right on your previous stitch or on the INSIDE of it.
This is where I got into trouble because I didn't do so hot keeping it all lined up. My fabric ended up bunching up and I had to cut it about 3 inches so it turned out more rectangular. I tried a few other stupid things that almost ruined the whole thing before I cut off the 3 inches. I would tell you more about it but it's not funny yet-I'm still a little aggravated with myself.
9. After sewing around the edges, trim outside the stitch to about 1/3 in. Turn rightside out. Now sew up the remaining few inches as you would a pillow.
Ta-Da, you have a Taggy!
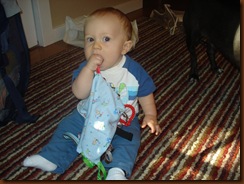
Give it to your kid and see what they do.
If he puts it in your mouth then you've done good.

2 comments:
I love it! I can't wait to make one! I know what you mean when you try to make something and it ends up costing more then the actual item! How did you put the snap ring in the corner? I also have those velcro wrist rattles, good idea. Tessa loves fabric best when it comes to toys.
Tahnee
leahanna gave me one for josiah already! great to know it will come in so handy! good idea though! i am so proud of how much of a do-it-yourself mommy you are. i don't think i will have the patience for such adventure. =)
Post a Comment